Link ConnectWise companies to SuperIT teams for proper ticket routing
After connecting ConnectWise to SuperIT, you need to link specific companies to your support teams. This ensures tickets from each ConnectWise company are automatically routed to the correct SuperIT team.
Prerequisites
- ConnectWise connection configured and syncing
- Companies synced from ConnectWise
- SuperIT managed teams created
Understanding Company-Team Links
How Routing Works
- Ticket Created: New ticket appears in ConnectWise for Company A
- SuperIT Checks: Looks up which team is linked to Company A
- Auto-Route: Ticket appears in the linked team's SuperIT interface
- AI Access: SuperIT can assist the assigned team with the ticket
Benefits of Proper Linking
- Automatic routing eliminates manual ticket assignment
- Team specialization allows dedicated support for specific clients
- AI context provides better assistance with client-specific knowledge
- Organized workflows keep teams focused on their assigned clients
Step 1: View Synced Companies
Access Company List
- Navigate to your ConnectWise connection in SuperIT
- Click the Companies tab
- Review the list of companies imported from ConnectWise
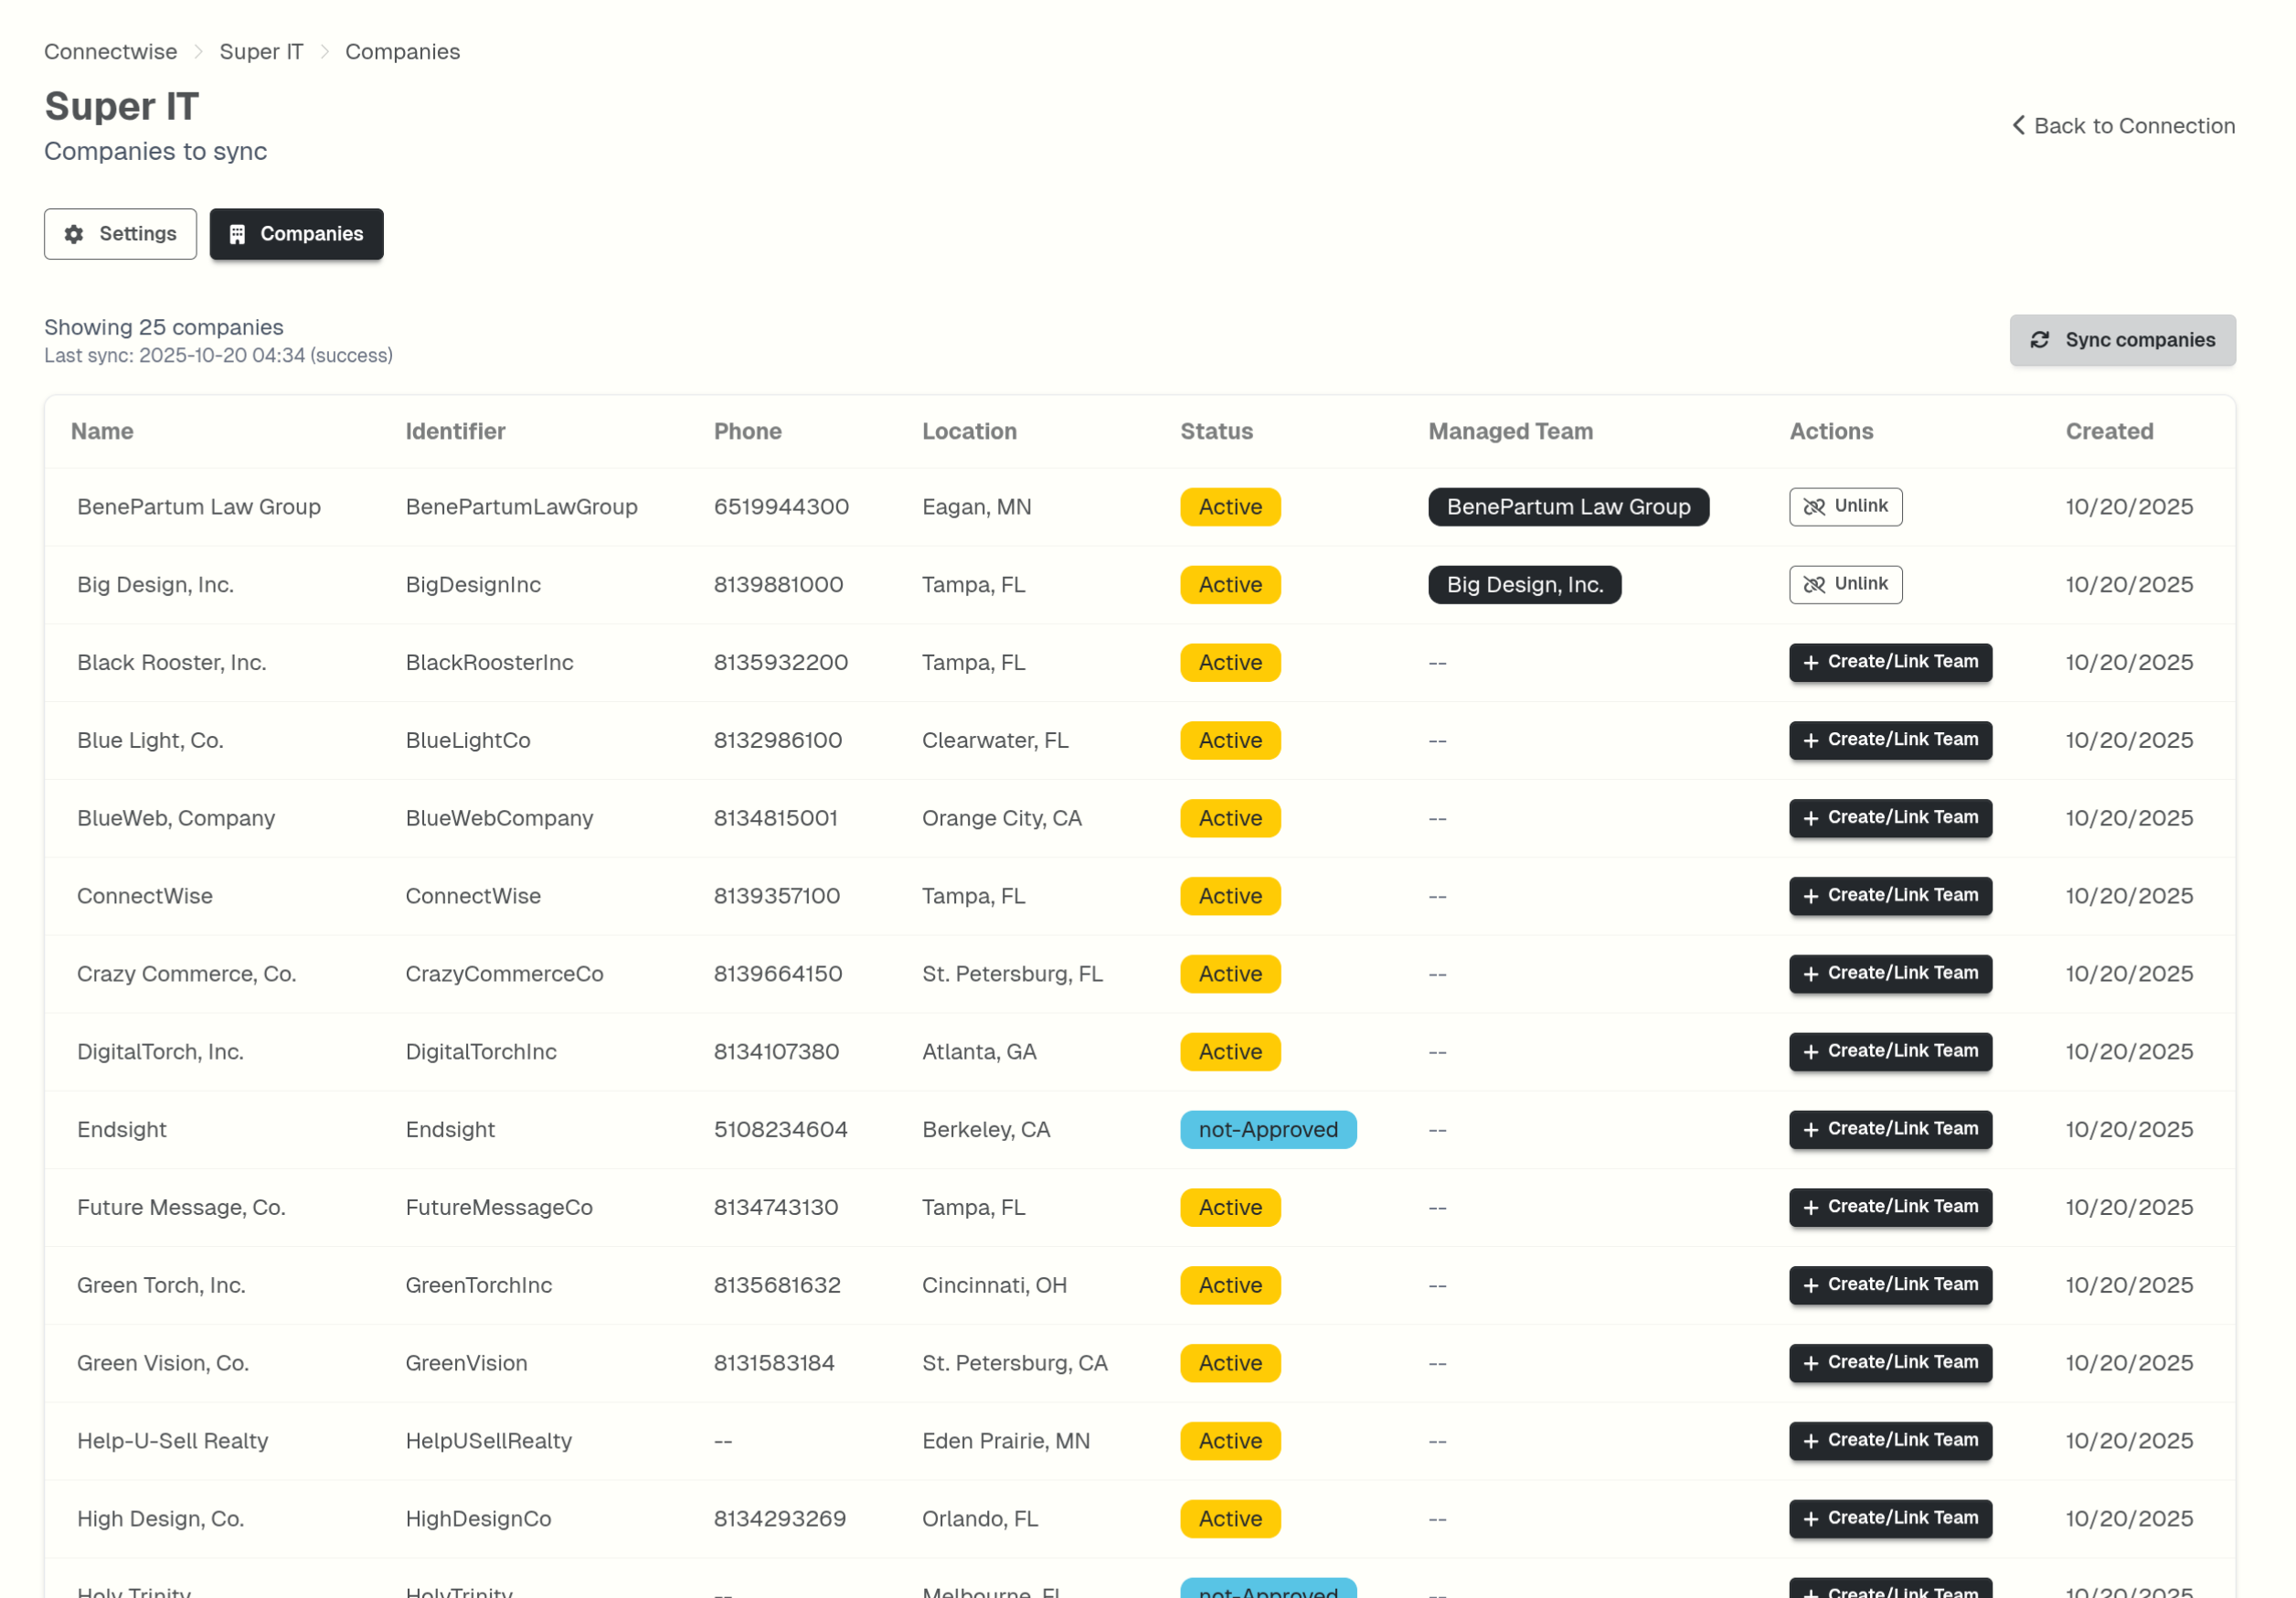
Company Information Displayed
- Company Name: As it appears in ConnectWise
- Status: Active, Inactive, or other ConnectWise status
- Link Status: Whether company is linked to a SuperIT team
- Ticket Count: Number of tickets associated with this company
- Last Sync: When company data was last updated
Filter and Search
- Filter by status: Show only active companies
- Search by name: Find specific companies quickly
- Sort options: By name, ticket count, or last update
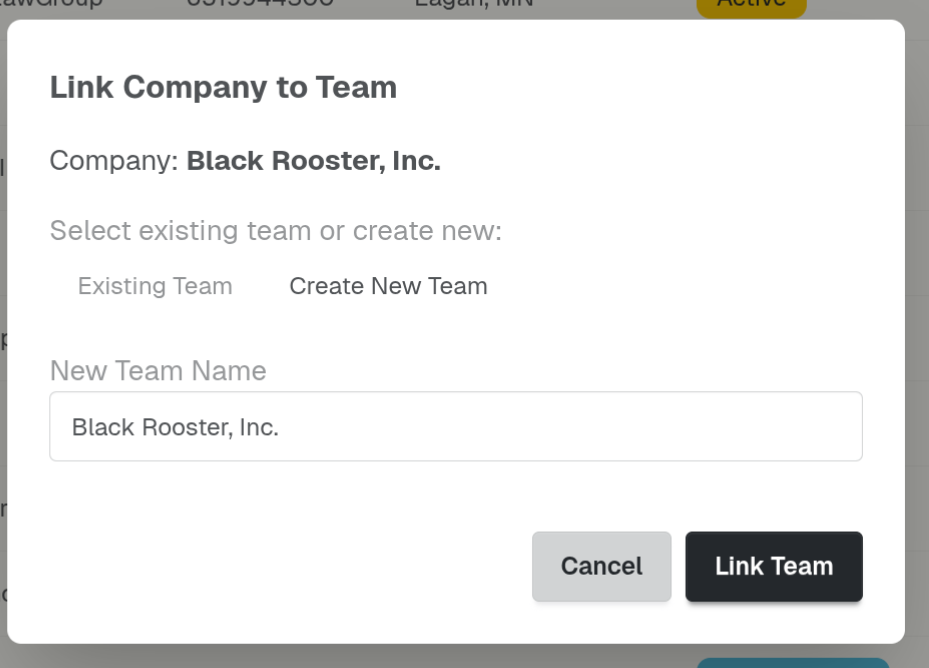
Step 2: Create Company-Team Links
Link a Company to a Team
- Click Link Team next to the company name
- Select the Managed Team from the dropdown
- Configure routing options:
- Service Board: Choose ConnectWise service board (if multiple)
- Auto-link: Enable automatic linking for new tickets
- Sync Settings: Configure bidirectional sync options
Link Configuration Options
Service Board Selection
Choose which ConnectWise service board this link should use: - Default Board: Use company's default service board - Specific Board: Select a particular board for this team - Multiple Boards: Create separate links for different boards
Status Mapping
Configure how ConnectWise statuses map to SuperIT workflows: - Create Status: Status for new tickets from this company - In Progress Status: Status when team is working the ticket - Done Status: Status when team completes work - Escalated Status: Status when ticket needs escalation
Sync Preferences
Control what data syncs between systems: - Ticket Updates: Sync status changes from SuperIT to ConnectWise - Note Sync: Add SuperIT notes to ConnectWise tickets - Time Tracking: Sync time entries (if configured) - Priority Changes: Sync priority updates
Bulk Linking
For multiple companies with similar requirements: 1. Select companies using checkboxes 2. Click Bulk Link 3. Choose target team and common settings 4. Apply to all selected companies
Step 3: Configure Advanced Settings
Service Board Management
If your ConnectWise uses multiple service boards:
Per-Company Boards - Link each company to its designated service board - Ensures tickets are created in correct board - Maintains ConnectWise workflow organization
Team-Specific Boards - Route companies with similar needs to same board - Allows team specialization by service type - Simplifies team training and processes
Status Workflow Integration
SuperIT Workflows Configure status mappings that align with SuperIT's AI workflows: - "New" → ConnectWise "New" or custom initial status - "In Progress" → ConnectWise "Assigned" or "Work In Progress" - "Resolved" → ConnectWise "Resolved" or "Completed" - "Escalated" → ConnectWise "Escalated" or custom escalation status
Custom Mappings For specialized workflows: - Map SuperIT statuses to specific ConnectWise statuses - Handle client-specific status requirements - Maintain compliance with client SLAs
Priority and Type Mapping
Configure how ticket properties sync:
Priority Mapping - Low, Medium, High → ConnectWise priority values - Critical, Emergency → Appropriate escalation priorities - Custom priorities → Client-specific priority schemes
Ticket Type Mapping - Problem, Incident, Request → ConnectWise ticket types - Maintenance, Project → Specialized types - Custom types → Client-specific categorization
Step 4: Manage Existing Links
View Link Details
- Click on any linked company to view details
- Review current configuration and sync status
- Check recent ticket routing activity
Modify Link Settings
- Click Edit Link for any company
- Update team assignment, service board, or status mappings
- Changes apply to new tickets immediately
Deactivate Links
To stop routing tickets from a company: 1. Click Deactivate Link 2. Existing tickets remain with current team 3. New tickets won't be automatically routed
Transfer Companies
To move a company to a different team: 1. Edit the company link 2. Select new target team 3. Optionally transfer existing open tickets
Step 5: Monitor and Optimize
Check Routing Accuracy
Daily Review (first week): - Verify tickets are reaching correct teams - Check for any routing errors or missed tickets - Confirm team workload distribution
Weekly Review (ongoing): - Review company link performance - Adjust team assignments based on capacity - Update status mappings as workflows evolve
Performance Metrics
Monitor these indicators in SuperIT dashboard: - Routing Success Rate: Percentage of tickets properly routed - Team Workload: Distribution of tickets across teams - Response Times: Team performance by company - Escalation Rates: Companies requiring frequent escalation
Optimization Strategies
Load Balancing - Split large clients across multiple teams - Rotate smaller clients to balance workloads - Adjust assignments based on team capacity
Specialization - Group similar companies by industry or service type - Assign complex clients to experienced teams - Create specialized teams for specific service offerings
Automation - Use status mappings to reduce manual updates - Configure automatic escalation for SLA breaches - Set up alerts for high-priority client tickets
Common Scenarios
New Client Onboarding
- Company appears in ConnectWise sync
- Create company-team link with appropriate settings
- Configure service board and status mappings
- Test ticket routing with sample ticket
Team Restructuring
- Review current company assignments
- Plan new team-company mappings
- Update links in bulk where possible
- Communicate changes to affected teams
Client Offboarding
- Deactivate company-team link
- Complete or transfer any open tickets
- Archive company data as per retention policies
- Remove from active routing
Seasonal Adjustments
- Monitor ticket volume patterns by company
- Adjust team assignments for peak periods
- Create temporary links for seasonal support
- Return to normal assignments after peak
Troubleshooting
Tickets Not Routing
- Check company link status: Ensure link is active
- Verify team permissions: Confirm team can receive tickets
- Review sync logs: Look for routing errors
- Test with sample ticket: Create test ticket to verify routing
Wrong Team Assignment
- Update company link: Change target team in link settings
- Transfer existing tickets: Move current tickets if needed
- Check service board: Verify correct board selection
- Review team structure: Confirm team hierarchy is correct
Sync Issues
- Monitor sync status: Check for sync errors in logs
- Verify ConnectWise permissions: Ensure API access is sufficient
- Test webhook delivery: Confirm real-time updates work
- Review field mappings: Check status and priority mappings
Company links configured? Continue with Field Mapping to customize status and priority mappings, or check Troubleshooting if you encounter issues.